Starting an Amazon business can be a rewarding way to reach a global audience and grow your online income. If you’re unsure about what to sell, don’t worry. Many successful Amazon sellers begin without a specific niche and simply sell any products they find profitable. In this guide, we’ll walk you through 10 easy steps to start selling on Amazon, including tips on how to sell without a niche.
Step 1. Choose Your Selling Plan
Before selling on Amazon, it’s important to choose the right selling plan based on your goals, as there are costs associated with using the Amazon marketplace. There are two types of plans available.
They are individual selling plan and professional selling plan. The individual selling plan is best for those who plan to sell fewer than 40 items per month. With this plan, you’ll pay $0.99 per item sold, along with additional selling fees. The professional selling plan is ideal for those expecting to sell more than 40 items per month. This plan charges a flat monthly fee of $39.99, plus selling fees, but offers more advanced selling tools and features to help scale your business. The Professional plan is often better for scaling, so choose based on how much you plan to sell because selecting the right plan will depend on your expected sales volume and business needs.
Step 2. Create an Amazon Seller Account
After selecting your plan, you need to create a seller account. Head to Amazon Seller Central to register. You’ll be asked to provide your business name, email, bank details, and tax information. Having a chargeable credit card, valid email, and government ID on hand will make the process smoother.
If you don’t have a registered business, you can still sign up as an individual seller using your personal information. However, as your business grows, it might be beneficial to register your business to take advantage of potential tax benefits and establish a more professional presence on the platform.
Step 3. Pick Products to Sell
If you don’t have a niche in mind, focus on selling any profitable product you’re allowed to list. You can start by using tools like BuyBotPro analysis software to find trending, high-demand products with low competition. Check for a good profit margin after considering product costs, Amazon fees, and shipping. Look for categories like electronics, beauty, home goods, and fitness, which consistently have high sales volume.
Step 4. Check for Restrictions (Gated and Ungated Categories)
Before listing a product, ensure it’s not restricted. The BuyBotPro analysis software can help you find your way around it. Amazon has certain categories and products that require approval before selling. As a beginner, you may want to list products that are not restricted so you can avoid delays and issues regarding getting started quickly. Once you know you can sell the product, you’re good to proceed.
In summary, it’s essential to understand Amazon’s product listing guidelines. Products fall into either gated or ungated categories to ensure quality control and customer safety. This means sellers can’t simply list any product that could pose risks or issues for the marketplace. Gated products require approval, while ungated products are open to most sellers, helping maintain a safe and trustworthy platform.
GATED AND UNGATED PRODUCT LISTING
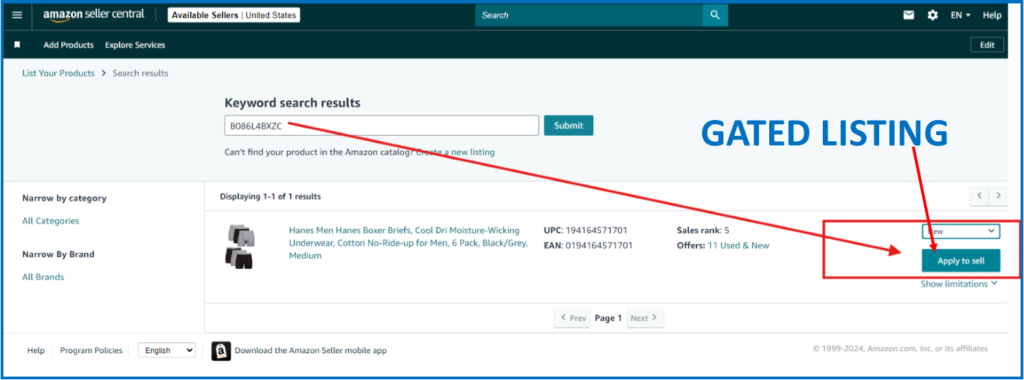
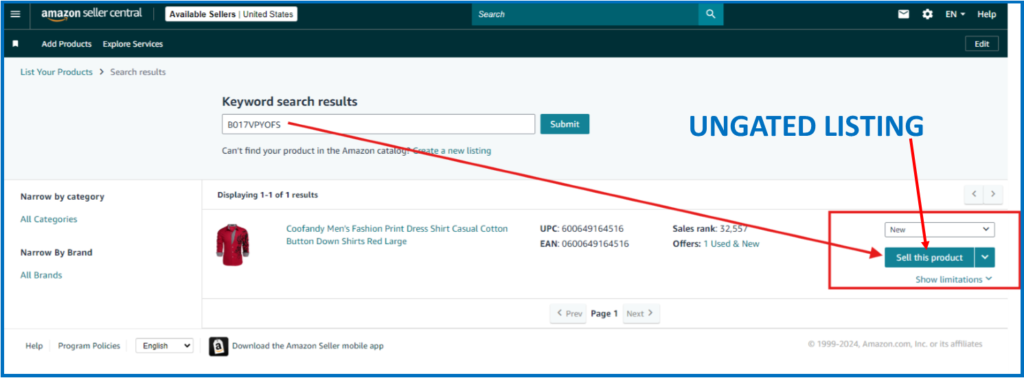
Before choosing your products, make sure to research whether they fall into gated or ungated categories. Selling in ungated categories allows you to start more easily, while gated categories, though more challenging to access, often have less competition and can offer higher profit margins once approved
Note also the difference between prohibited and restricted products on Amazon marketplace. Prohibited Products are items that cannot be sold on Amazon under any circumstances. They are completely banned due to legal, safety, or ethical reasons. Examples include counterfeit goods, firearms, explosives, and illegal substances. Listing these products can result in severe penalties like account suspension or a permanent ban.
Restricted Products on the other hand, can be sold, but only with approval from Amazon or under specific conditions. Sellers may need to meet certain requirements, such as submitting documentation or adhering to strict guidelines. Categories like health supplements, beauty products, and electronics often have restrictions to ensure product quality and compliance with laws.
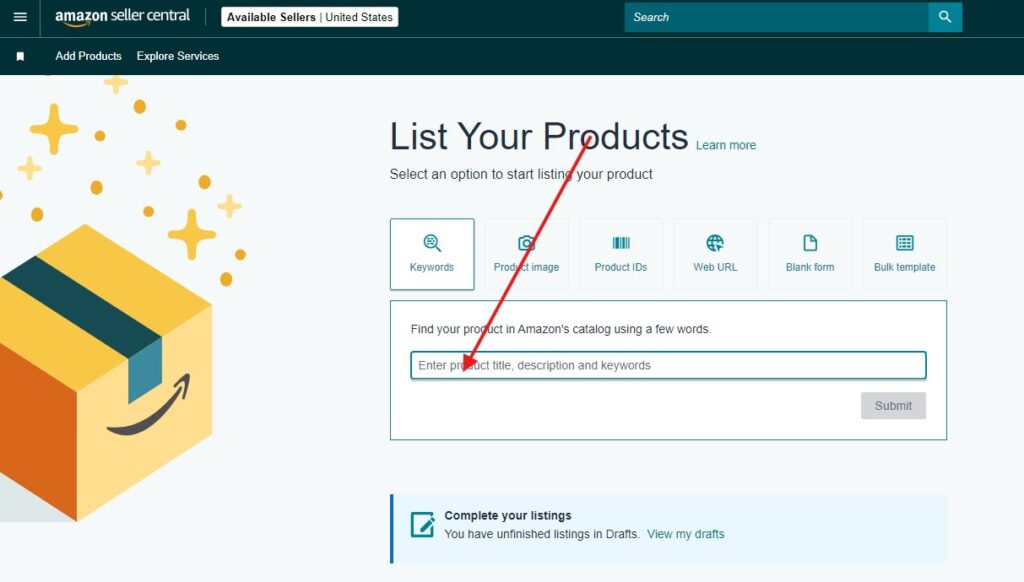
Step 5. List Your Products
When it comes to listing your products on Amazon, you don’t always need to create a brand-new listing. If the product you want to sell is already listed and is profitable, Amazon allows you to sell under that existing listing. This saves time and effort as you can simply add your inventory and price to the same product page. However, if you’re introducing a product that isn’t already listed on Amazon, then you’ll need to create a new listing altogether.
Remember, you cannot skip proper product analysis to decide on which products are profitable. Doing this manually with just your bare eyes won’t help your business grow effectively. You need the best software designed for product analysis, such as BuyBotPro to ensure your choices have high potential. This tool will help you assess demand, competition, and profit margins, providing data to back your decisions and enhance your product listings.
Step 6. Set a Competitive Price
Pricing your products is an essential part of making sales. Research the market BuyBotPro and see what competitors are charging. You’ll also want to factor in Amazon fees (FBM or FBA) and shipping costs to ensure you’re making a profit. Setting a competitive price will also improve your chances of winning the Amazon Buy Box, which helps drive sales. What is the buy box?
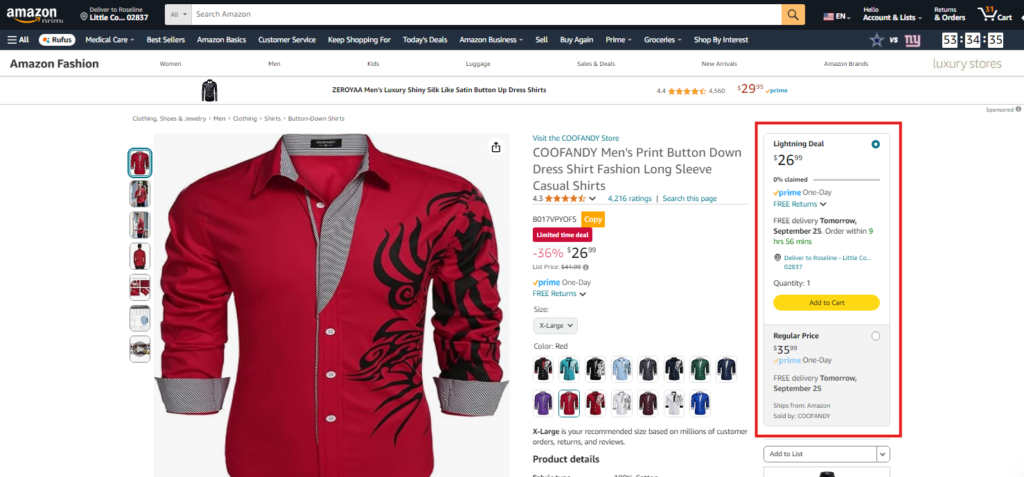
The Amazon Buy Box is the section on a product page where customers can click “Add to Cart” or “Buy Now.” It appears on the right-hand side of the page and is responsible for the majority of sales on Amazon. Multiple sellers may offer the same product, but only one can win the Buy Box at a time. Amazon’s algorithm determines which seller gets the Buy Box based on factors like price, shipping speed, seller performance, and customer service. Winning the Buy Box is crucial for increasing sales and visibility on the platform.
Step 7. Decide on Fulfillment Method
Amazon provides two main fulfillment (that is shipping and handling) options for sellers to choose from. The first is Fulfillment by Merchant (FBM). That means you the seller will handle packing, shipping, and customer service of your selling business on amazon. It gives you more control but requires more effort. The second option is Fulfillment by Amazon (FBA. With this option, Amazon stores, picks, packs, and ships your products to your customers for you. They also handle customer service. FBA can save time and effort, and it increases your chances of getting your products listed under Amazon Prime. What is Amazon Prime?
Amazon Prime is a subscription service that provides members with benefits such as free two-day shipping, access to streaming video and music, exclusive deals, and additional shopping perks on the Amazon platform. For those selling a wide range of products without a niche, FBA is often the easiest and most efficient choice.
Step 8. Optimize for Amazon SEO
To boost your product visibility, you need to focus on SEO for your listings. Research the keywords your customers are using when they search for similar products. Include these keywords in your product titles, descriptions, and bullet points. For example, if you’re selling a yoga mat, include keywords like “non-slip yoga mat,” “eco-friendly yoga mat,” or “best yoga mat for beginners.” This helps your product appear in search results when potential customers are looking for it.
Step 9. Monitor Reviews and Customer Feedback
Product reviews are a critical factor in Amazon’s marketplace. Positive reviews will help you sell more, while negative reviews can hurt your sales and visibility. Provide excellent customer service to encourage positive feedback, and monitor reviews regularly. If you receive negative reviews, address the issue professionally. Handling complaints well can turn an unhappy customer into a loyal one.
10. Promote Your Products and Adjust
Even with great listings, you’ll want to promote your products to drive traffic and boost sales. Use Amazon’s internal advertising options, like Sponsored Products and Sponsored Brands, to get your products in front of more customers. These ads appear in search results and on product pages. Additionally, promote your products on social media, blogs, or email marketing. If you see certain products performing better, focus on promoting those and adjust your pricing, listings, and keywords to maximize sales.
Start Selling on Amazon Today
Selling on Amazon doesn’t have to be overwhelming, even if you don’t have a specific niche in mind. By following these 10 steps, you can start selling profitable products, reach millions of potential buyers, and grow your business.
From choosing your selling plan to listing your products and optimizing them for Amazon SEO, every step is essential to building a successful Amazon business. The beauty of selling on Amazon is the flexibility it offers and you can test and sell any products that are profitable and adjust your strategy as you go.
Take your first step today, and you’ll be on your way to becoming a successful Amazon seller.


